
Installing a new plumbing fixture can be one of the simplest ways to update a bathroom or kitchen without a major renovation. A new faucet, sink, showerhead, or toilet can improve appearance, water efficiency, and everyday convenience. However, a successful installation depends on more than simply connecting pipes. You need the correct fixture, compatible fittings, proper seals, and a reliable shutoff connection. In this guide, Hi-Tech Plumbing Services Inc explains how to install common plumbing fixtures safely, what tools you need, which mistakes to avoid, and when it’s better to call a professional plumber.
What Counts as a Plumbing Fixture?
A plumbing fixture is a device connected to a home’s water supply or drainage system. Common residential plumbing fixtures include:
- Bathroom and kitchen faucets
- Sinks and lavatories
- Toilets
- Showerheads
- Bathtubs
- Shower valves
- Utility and laundry sinks
Each fixture connects to a larger plumbing system made up of water supply lines, valves, traps, drains, vents, and fittings. Understanding how those components work together makes DIY plumbing installation much easier.
Before You Start: Check the Existing Plumbing
Before removing anything, inspect the plumbing underneath or behind the fixture. Look for corrosion, mineral buildup, damaged shutoff valves, cracked supply lines, or signs of previous leaks.
This step is especially important in older Los Angeles homes. Replacing a fixture can expose problems that were already developing behind the wall or under the cabinet.
If the existing pipes or valves are badly deteriorated, replacing only the fixture may provide a temporary solution. In that situation, Hi-Tech Plumbing Services Inc’s Piping & Repiping Services may be a more appropriate long-term option.
Basic tools and materials
For a straightforward fixture replacement, you may need:
- Adjustable wrench
- Basin wrench
- Screwdriver
- Pliers
- Bucket
- Towels or rags
- Plumber’s tape where appropriate
- Replacement washers or gaskets
- Silicone sealant when specified by the manufacturer
- New flexible supply lines if required
Always follow the installation instructions supplied with your specific fixture. Connection sizes and sealing methods can vary between manufacturers.
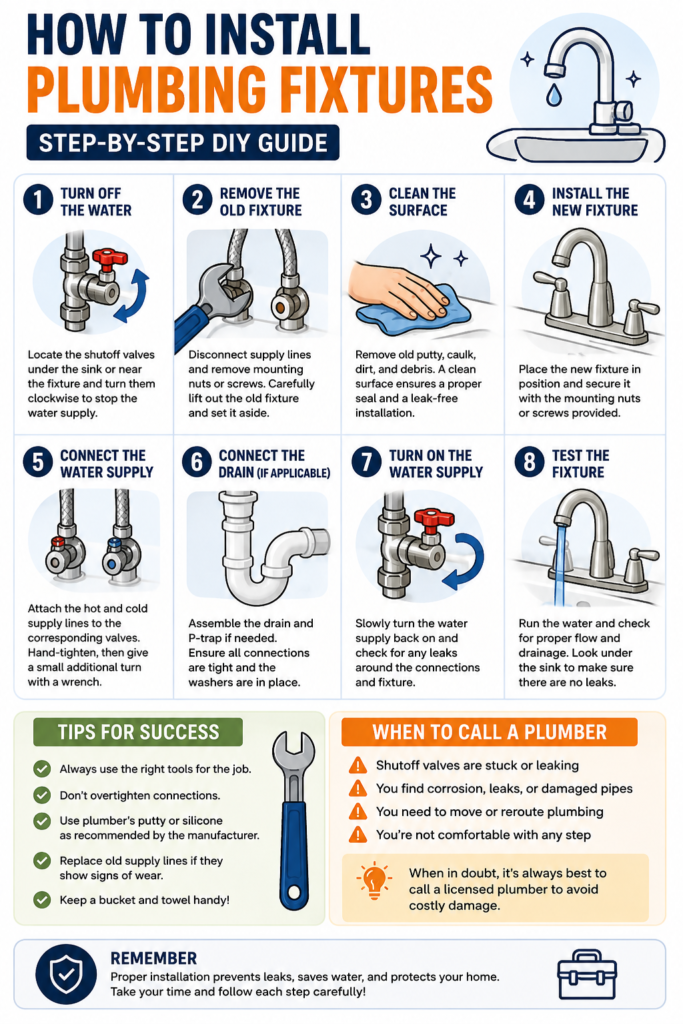
Step 1: Turn Off the Water Supply
Never begin removing a fixture while the water is still flowing. Most fixtures have individual shutoff valves located underneath or behind them. Turn the valve clockwise until the water stops. Then open the faucet or flush the toilet to release pressure from the line.
Place a bucket underneath the connection before disconnecting the supply line. A small amount of trapped water is normal.
What if the shutoff valve doesn’t work?
Don’t force an old valve. A corroded or seized shutoff can break and create a much larger leak. If you cannot completely stop the water, use the home’s main water shutoff and have the valve inspected before continuing.
Step 2: Remove the Old Fixture Carefully
Once the water is off, disconnect the supply lines and remove the hardware holding the fixture in place. For a faucet, this usually means loosening the mounting nuts underneath the sink. For a toilet, the supply connection and floor bolts must be removed before the fixture can be lifted. Take your time during removal. Old fixtures may be stuck because of corrosion, mineral deposits, old sealant, or rusted fasteners.
If you’re replacing a sink or faucet and discover water damage inside the cabinet, don’t simply cover the damage with the new fixture. Find the source first. For hidden leaks, Leak Detection & Repair from Hi-Tech Plumbing Services Inc can help identify the underlying problem.
Step 3: Clean the Mounting Surface
Before installing the new fixture, clean the surface thoroughly.
Remove:
- Old plumber’s putty
- Silicone residue
- Mineral deposits
- Rust
- Dirt
- Old gasket material
The new fixture needs a clean, flat surface to create a proper seal. Leaving old material behind can cause the fixture to sit unevenly or allow water to seep underneath.
This is a small step, but it can make the difference between a leak-free installation and having to redo the job later.
Step 4: Install the New Fixture
The installation method depends on the fixture.
Installing a Faucet
Position the faucet through the sink or countertop openings and secure it underneath according to the manufacturer’s instructions. Connect the hot and cold supply lines to their corresponding valves.
Avoid overtightening the connections. A connection needs to be secure, but excessive force can damage threads, fittings, or the fixture itself.
Installing a Showerhead
Showerhead replacement is usually one of the easiest plumbing upgrades. Remove the old showerhead, clean the threaded shower arm, and install the new unit according to the manufacturer’s instructions.
A WaterSense-labeled showerhead is worth considering if water efficiency is important. EPA says WaterSense showerheads use no more than 2.0 gallons per minute, compared with the federal maximum of 2.5 gallons per minute for standard showerheads. EPA estimates an average family can save about 2,700 gallons of water per year by installing WaterSense-labeled showerheads.
Installing a Toilet
Toilet installation requires more care because the connection between the toilet and drain must be properly sealed. The basic process involves positioning a new wax or manufacturer-approved sealing system over the drain flange, carefully lowering the toilet into position, securing it evenly, connecting the water supply, and testing for leaks.
Do not overtighten the floor bolts. Excessive pressure can crack the porcelain. If the toilet rocks after installation, don’t simply tighten the bolts harder. The flange or floor may need attention.
For homeowners who prefer professional installation, Toilet Installation & Repair is available from Hi-Tech Plumbing Services Inc.
Step 5: Connect the Water Supply
Once the fixture is secured, connect the water supply line. Some connections seal with an internal washer and should not receive additional thread sealant. Others may require an approved sealing method. Always follow the fixture manufacturer’s instructions instead of automatically adding plumber’s tape to every connection.
Check that:
- The connection is properly aligned.
- The washer or gasket is correctly positioned.
- The supply line isn’t kinked.
- Connections are snug but not excessively tight.
- Hot and cold lines are connected correctly.
Step 6: Turn the Water Back On Slowly
This is where patience pays off. Open the shutoff valve gradually and watch every connection as water pressure returns. Don’t immediately walk away after turning the valve back on. Use a dry paper towel around connections. Even a small leak will make the towel noticeably damp.
Let the fixture run for several minutes and check underneath the cabinet, around the supply connections, and at the drain.
Quick leak-check table
| Area to Check | What to Look For |
|---|---|
| Supply connection | Drips or moisture |
| Shutoff valve | Seepage around valve stem |
| Faucet base | Water underneath fixture |
| Drain connection | Leaking trap or tailpiece |
| Toilet base | Water around floor connection |
| Showerhead | Dripping threaded connection |
If you find an active leak that you cannot stop safely, shut off the water and call a plumber rather than continuing to tighten fittings.
Step 7: Test the Fixture
A fixture isn’t properly installed until it works correctly under normal conditions.
Run the faucet, flush the toilet, or operate the shower and observe the system for several minutes. Check both the fixture itself and the surrounding plumbing.
For a sink or faucet, also inspect the drain while water is flowing. A supply connection can be completely dry while the drain or trap leaks underneath.
How to Choose Water-Efficient Plumbing Fixtures
Fixture replacement is also an opportunity to reduce water consumption.
EPA reports that bathroom sink faucets with the WaterSense label use a maximum of 1.5 gallons per minute, compared with the standard 2.2 gallons per minute, while maintaining performance requirements. EPA estimates replacing old inefficient faucets and aerators can save an average family about 700 gallons of water per year.
Toilets can make an even larger difference. According to EPA WaterSense, toilets account for nearly 30% of average residential indoor water use, while WaterSense-labeled toilets use 1.28 gallons per flush or less.
When shopping for a replacement fixture, consider more than appearance. Look at flow rate, compatibility, durability, manufacturer specifications, and whether the product carries a recognized efficiency certification.
Common Plumbing Fixture Installation Mistakes
DIY installation becomes risky when homeowners rush through the small details.
Avoid these mistakes:
- Forgetting to shut off the water completely
- Reusing damaged supply lines or washers
- Overtightening fittings
- Using the wrong type of sealant
- Installing a fixture without checking compatibility
- Ignoring a corroded shutoff valve
- Failing to test for leaks
- Continuing to use a damaged drain or supply pipe
One particularly common mistake is treating every plumbing problem as a fixture problem. If a new faucet continues leaking because the valve or supply line is damaged, replacing the faucet again won’t solve the underlying issue.
When Should You Hire a Professional Plumber?
Replacing a showerhead or simple faucet may be manageable for an experienced DIY homeowner. More complicated installations are different.
Call a licensed plumber if the project involves:
- Corroded or broken shutoff valves
- Hidden leaks
- Damaged water supply lines
- Drain or sewer problems
- Moving plumbing connections
- New shower valves
- Toilet flange problems
- Water pressure issues
- Repiping or pipe replacement
Hi-Tech Plumbing Services Inc handles fixture installation and repair throughout Los Angeles, including faucets, sinks, toilets, shower valves, and other plumbing fixtures. Our team can also diagnose the plumbing behind the fixture when a simple replacement isn’t enough.
For homeowners planning a larger bathroom or kitchen upgrade, professional installation can also help prevent the new fixture from exposing—and worsening—an existing plumbing problem.
How Hi-Tech Plumbing Services Inc Can Help
A new plumbing fixture should improve your home, not create another leak to worry about.
Hi-Tech Plumbing Services Inc provides professional plumbing fixture installation and repair for residential and commercial properties throughout Los Angeles. Our services include Fixture Installation, sink installation, toilet installation and repair, shower valve work, leak detection, repiping, and other plumbing solutions.
If you’re replacing a fixture because of an active leak, recurring plumbing problem, or outdated connection, our plumbers can inspect the surrounding system and recommend the right solution rather than simply replacing the visible component.
Frequently Asked Questions
Can I install plumbing fixtures myself?
Simple replacements, such as a showerhead or some faucets, may be suitable for experienced DIY homeowners. Projects involving water lines, drain modifications, valves, or concealed plumbing are better handled by a qualified plumber.
Do I need plumber’s tape on every connection?
No. Some connections seal with a washer or gasket and should not have tape added. Use the sealing method specified by the fixture manufacturer.
How do I know if my new fixture is leaking?
Run the fixture and inspect every supply and drain connection. A dry paper towel can make small leaks easier to identify.
Are WaterSense fixtures worth it?
For many households, yes. WaterSense-labeled fixtures are independently certified for water efficiency and performance. EPA data shows that efficient faucets, showerheads, and toilets can reduce water use without requiring homeowners to sacrifice normal fixture performance.
When should I stop a DIY plumbing project?
Stop if you cannot shut off the water, discover damaged piping, encounter a seized valve, find a hidden leak, or need to modify plumbing inside a wall or floor. Continuing can turn a small installation into a much more expensive repair.